uno arduino
简要 (Brief)
Since December 8, 2019, several cases of pneumonia with unknown etiology have been reported in Wuhan City, Hubei Province, China. In recent months, nearly 80000 confirmed cases have been caused in the whole country, and the impact of the epidemic has been expanding. Not only the whole country has been affected, but also the confirmed cases have appeared in the whole world, and the cumulative confirmed cases have reached 3.5 million. At present, the source of infection is uncertain From where, but we can be sure that everyone needs masks very much, and those who are serious need respirators.
自2019年12月8日以来,中国湖北省武汉市报告了几例病因不明的肺炎。 近几个月来,全国已确诊病例近8万例,流行病的影响在扩大。 不仅影响了整个国家,而且全世界也出现了确诊病例,累计确诊病例达到350万。 目前,感染源尚不确定,但可以确定每个人都非常需要口罩,而严重的人则需要戴口罩。
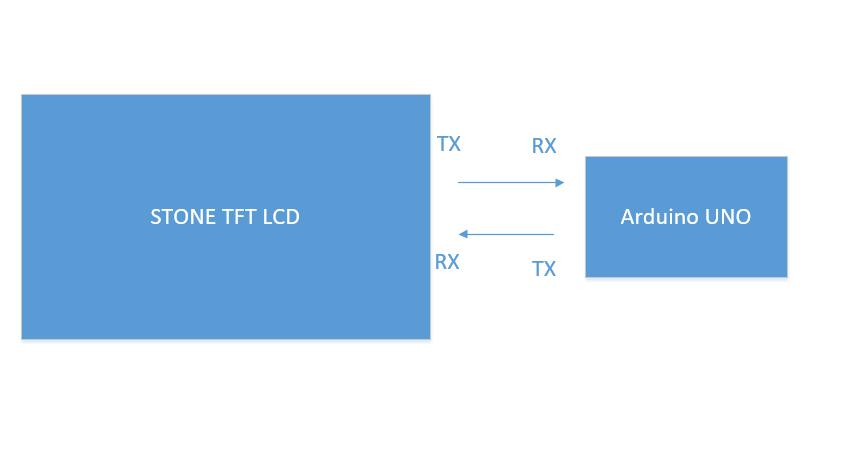
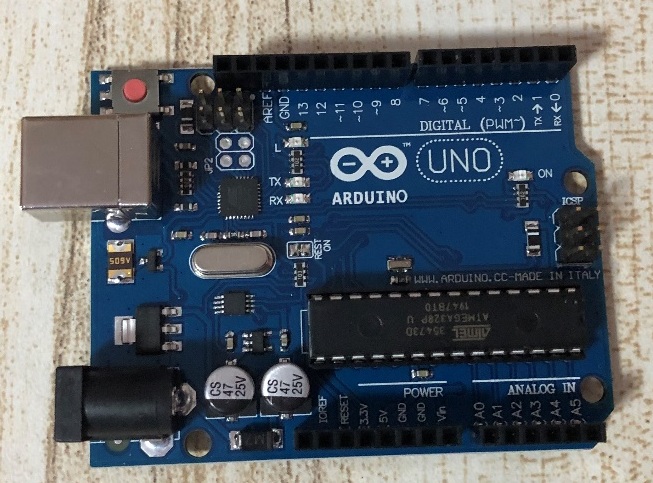
So, taking advantage of this hot spot, I also came to do a project about the ventilator, and there was a STONE in my hand TFT serial port screen is very suitable for the display screen of the ventilator. When the screen is available, I need a single-chip microcomputer to process the commands issued by STONE's serial port screen and upload some waveform data in real time. Here I choose a more general and easy to use MCU, Arduino uno single-chip microcomputer, which is widely used and supports many libraries.
因此,利用这个热点,我也来做一个有关呼吸机的项目,并且我的手动TFT串行端口屏幕上有一块STONE,非常适合呼吸机的显示屏。 当屏幕可用时,我需要一台单片机来处理由STONE的串行端口屏幕发出的命令,并实时上传一些波形数据。 在这里,我选择了一种更通用且易于使用的MCU,即Arduino uno单片机,该单片机被广泛使用并支持许多库。
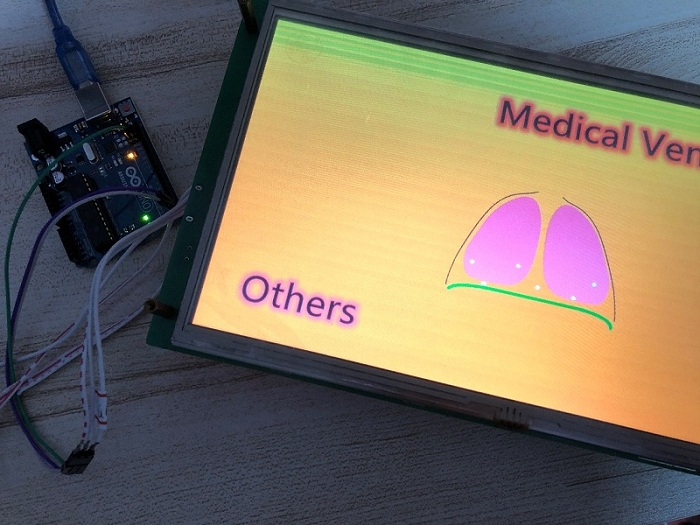
The renderings are as follows:
效果图如下:

In this project, you can control the Arduino uno development board by using the STONE TFT LCD serial port screen, and carry out data command interaction through serial port communication. The Arduino uno development board can upload a series of waveform data and display it on the serial port screen. This project is very helpful for making the ventilator display screen.
在该项目中,您可以使用STONE TFT LCD串行端口屏幕控制Arduino uno开发板,并通过串行端口通信进行数据命令交互。 Arduino uno开发板可以上传一系列波形数据,并将其显示在串行端口屏幕上。 该项目对于制作呼吸机显示屏非常有帮助。
项目概况 (Project Overview)
The ventilator project I do here will have a startup animation effect after power on, then enter a startup initial solution interface, and display the word «open». Click it to have a voice effect, prompt to open the ventilator, and jump to the page selection interface, where there will be an animation effect, which is an animation to show the human breath, and there are two options The first is the oscillogram monitoring chart of respiration. The second is the oxygen and respiratory rate monitoring chart. How to display so many oscillograms at the same time is a problem. After clicking enter, STONE TFT LCD will issue a specific command to control MCU to start to upload the waveform data.
我在此处执行的呼吸机项目在开机后将具有启动动画效果,然后进入启动初始解决方案界面,并显示“打开”字样。 单击它具有声音效果,提示打开呼吸机,然后跳到页面选择界面,那里将有一个动画效果,这是一个显示人呼吸的动画,有两个选项,第一个是波形图呼吸监测图。 第二个是氧气和呼吸频率监测图。 如何同时显示这么多的波形图是一个问题。 单击回车后,STONE TFT LCD将发出特定命令以控制MCU开始上载波形数据。
The functions are as follows:
功能如下:
① realize button setting;
①实现按键设置;
② Realize voice function;
②实现语音功能;
③ realize page switching;
③实现页面切换;
④ realize real-time waveform transmission.
④实现实时波形传输。
Modules required for the project:
项目所需的模块:
① STONE HMI display;
①STONE HMI显示 ;
② Arduino uno module;
②Arduino uno模块 ;
③ voice play module.
③语音播放模块。
项目框图 (Project block diagram)
硬件介绍及原理 (Hardware introduction and principle)
喇叭 (Loudspeaker)
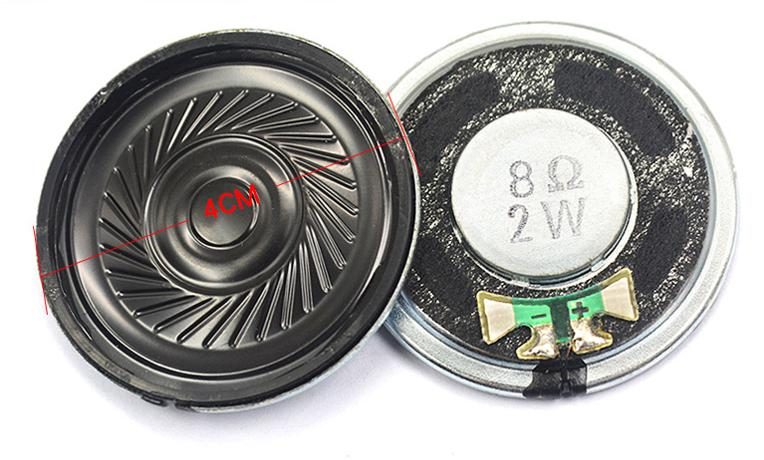
Because STONE TFT LCD has audio driver and reserved corresponding interface, it can use the most common magnet speaker, commonly known as loudspeaker. Loudspeaker is a kind of transducer which transforms electrical signal into acoustic signal. The performance of loudspeaker has a great influence on the sound quality. Loudspeakers are the weakest component in audio equipment, and for audio effect, they are the most important component. There are many kinds of loudspeakers, and the prices vary greatly. Audio electric energy through electromagnetic, piezoelectric or electrostatic effects, so that its paper basin or diaphragm vibration and resonance with the surrounding air (resonance) and produce sound.
由于STONE TFT LCD具有音频驱动器并保留了相应的接口,因此它可以使用最常见的磁扬声器,通常称为扬声器。 扬声器是一种将电信号转换为声信号的换能器。 扬声器的性能对音质有很大影响。 扬声器是音频设备中最弱的组件,对于音频效果,它们是最重要的组件。 扬声器种类很多,价格也相差很大。 音频电能通过电磁,压电或静电作用,使它的纸盆或隔膜振动并与周围的空气共振(共振)并产生声音。
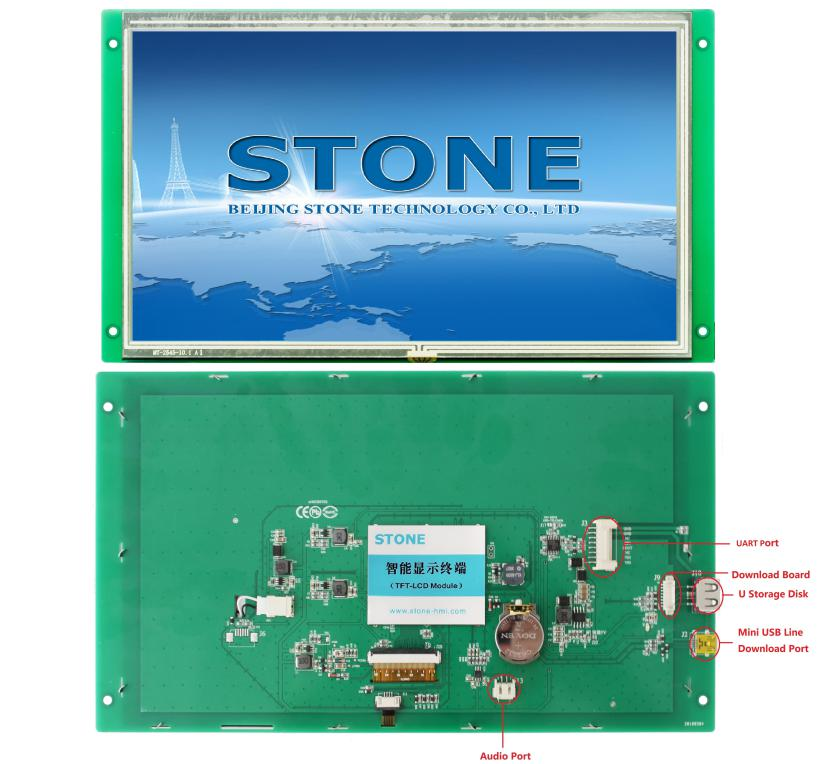
四通STVC101WT-01 (STONE STVC101WT-01)
- 10.1 inch 1024×600 industrial grade TFT panel and 4-wire resistance touch screen; 10.1英寸1024×600工业级TFT面板和4线电阻触摸屏;
- brightness is 300cd / m2, LED backlight; 亮度为300cd / m2,LED背光;
- RGB color is 65K; RGB颜色为65K;
- visual area is 222.7mm * 125.3mm; 可视区域为222.7mm * 125.3mm;
- visual angle is 70 / 70 / 50 / 60; 视角为70/70/50/60;
- working life is 20000 hours. 32-bit cortex-m4 200Hz CPU; 工作寿命为20000小时。 32位cortex-m4 200Hz CPU;
- CPLD epm240 TFT-LCD controller; CPLD epm240 TFT-LCD控制器;
- 128MB (or 1GB) flash memory; 128MB(或1GB)闪存;
- USB port (U disk) download; USB端口(U盘)下载;
- toolbox software for GUI design, simple and powerful hex instructions. 用于GUI设计的工具箱软件,简单而强大的十六进制指令。
基本功能 (Basic functions)
- Touch screen control / display image / display text / display curve / read and write data / play video and audio. It is suitable for various industries. 触摸屏控制/显示图像/显示文本/显示曲线/读取和写入数据/播放视频和音频。 适用于各种行业。
- UART interface is RS232 / RS485 / TTL; UART接口为RS232 / RS485 / TTL;
- voltage is 6v-35v; 电压为6v-35v;
- power consumption is 3.0w; 功耗为3.0w;
- working temperature is — 20 ℃ / + 70 ℃; 工作温度为— 20℃/ + 70℃;
- air humidity is 60 ℃ 90%. 空气湿度为60℃的90%。
STVC101WT-01 LCD module communicates with MCU through serial port, which needs to be used in this project. We only need to add the designed UI picture through the upper computer through the menu bar options to buttons, text boxes, background pictures, and page logic, then generate the configuration file, and finally download it to the display screen to run.
STVC101WT-01 LCD模块通过串口与MCU通讯,本项目需要使用该串口。 我们只需要通过菜单栏选项通过上部计算机将设计的UI图片添加到按钮,文本框,背景图片和页面逻辑中,然后生成配置文件,最后将其下载到显示屏即可运行。

The manual can be downloaded through the official website
手册可通过官方网站下载
In addition to the data manual, there are user manuals, common development tools, drivers, some simple routine demos, video tutorials, and some for testing projects.
除了数据手册,还有用户手册,通用开发工具,驱动程序,一些简单的例程演示,视频教程以及一些用于测试项目的工具。
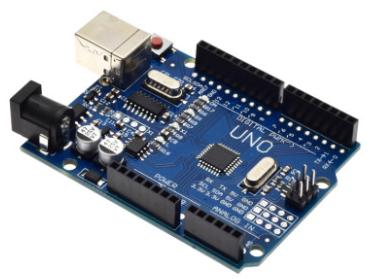
Arduino UNO (Arduino UNO)
Parameter
参数
Model Arduino Uno
型号Arduino Uno
Microcontroller atmega328p
单片机atmega328p
Working voltage 5 V
工作电压5 V
Input voltage (recommended) 7-12 V
输入电压(推荐)7-12 V
Input voltage (limit) 6-20 V
输入电压(极限)6-20 V
Digital I / O pin 14
数字量I / O引脚14
PWM channel 6
PWM通道6
Analog input channel (ADC) 6
模拟输入通道(ADC)6
DC output per I / O 20 mA
每个I / O的直流输出20 mA
3.3V port output capacity 50 mA
3.3V端口输出容量50 mA
Flash 32 KB (0.5 KB for bootstrapper)
Flash 32 KB(引导程序为0.5 KB)
SRAM 2 KB
SRAM 2 KB
EEPROM 1 KB
EEPROM 1 KB
Clock speed 16 MHz
时钟速度16 MHz
On board LED pin 13
板载LED引脚13
Length 68.6 mm
长度68.6毫米
Width 53.4 mm
宽度53.4毫米
Weight 25 g
重量25克
开发步骤 (Development steps)
Arduino UNO (Arduino UNO)
Download IDE
下载IDE
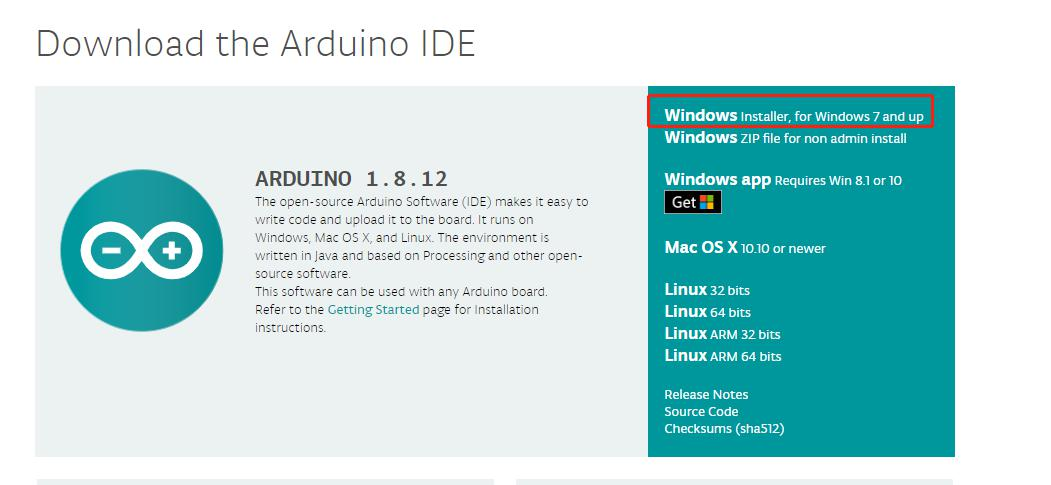
Link: www.arduino.cc/en/Main/Software
链接: www.arduino.cc/en/Main/软件
Here, because my computer is win10, I choose the first one and click in
在这里,因为我的计算机是win10,所以我选择第一个,然后单击

Select just download
选择只是下载
安装Arduino (Install Arduino)
After downloading, double-click to install it. It should be noted that Arduino ide depends on Java development environment and requires a PC to install Java JDK and configure variables. If double-click startup fails, the PC may not have JDK support.
下载后,双击以安装它。 应当注意,Arduino ide取决于Java开发环境,并且需要PC来安装Java JDK并配置变量。 如果双击启动失败,则PC可能不支持JDK。
码 (Code)
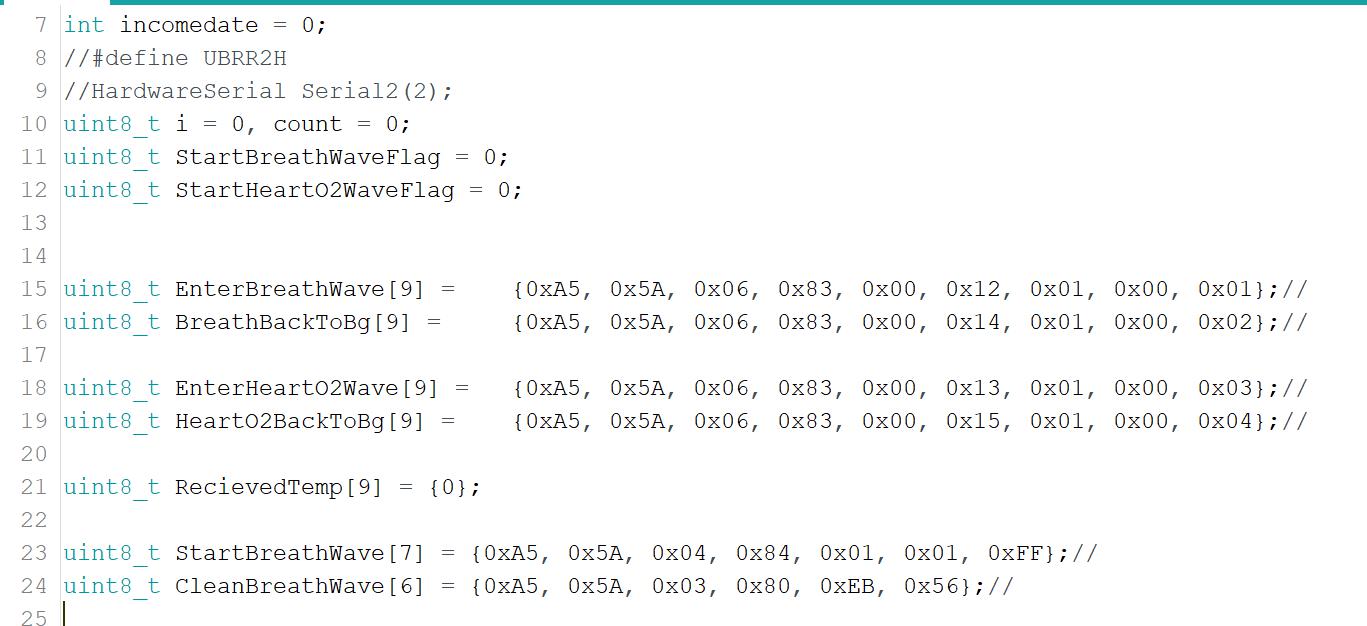
Here you need to set the command to identify the serial port screen, and:
在这里,您需要设置命令以识别串行端口屏幕,并且:
- Enterbreathwave is a button command sent from the recognition screen to enter the breathing interface Enterbreathwave是从识别屏幕发送的进入呼吸界面的按钮命令
- Breatbacktobg is the button command sent from the recognition screen to exit the breathing interface Breatbacktobg是从识别屏幕发送的用于退出呼吸界面的按钮命令
- Enterhearto2wave is the button command to enter the oxygen interface sent from the identification screen Enterhearto2wave是进入识别屏幕发送的氧气界面的按钮命令
- Hearto2backtobg is the button command sent from the recognition screen to exit the oxygen interface Hearto2backtobg是从识别屏幕发送的退出氧气界面的按钮命令
- Startwave is the initial waveform data sent to the screen. Startwave是发送到屏幕的初始波形数据。
- Cleanwave is used to clear the waveform data sent to the screen. Cleanwave用于清除发送到屏幕的波形数据。
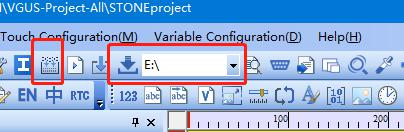
- Then click the tick to compile. After the compilation is completed, click the second arrow icon to download the code into the development board. 然后单击对勾进行编译。 编译完成后,单击第二个箭头图标以将代码下载到开发板上。
工具2019 (TOOL 2019)
Add picture
添加图片
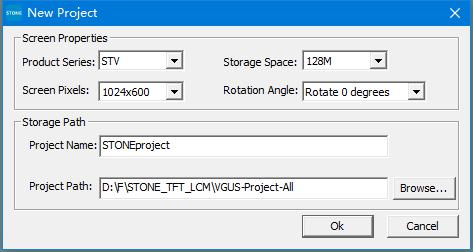
Use the installed tool 2019, click the new project in the upper left corner, and then click OK.
使用已安装的工具2019,单击左上角的新项目,然后单击确定。
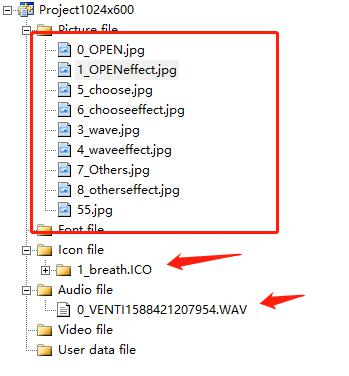
After that, a default project will be generated with a blue background by default. Select it and right-click, then select remove to remove the background. Then right click picture file and click Add to add your own picture background, as follows:
此后,默认情况下将生成带有蓝色背景的默认项目。 选择它并单击鼠标右键,然后选择“删除”以删除背景。 然后右键单击图片文件,然后单击添加以添加您自己的图片背景,如下所示:
设置图片功能 (Set picture function)
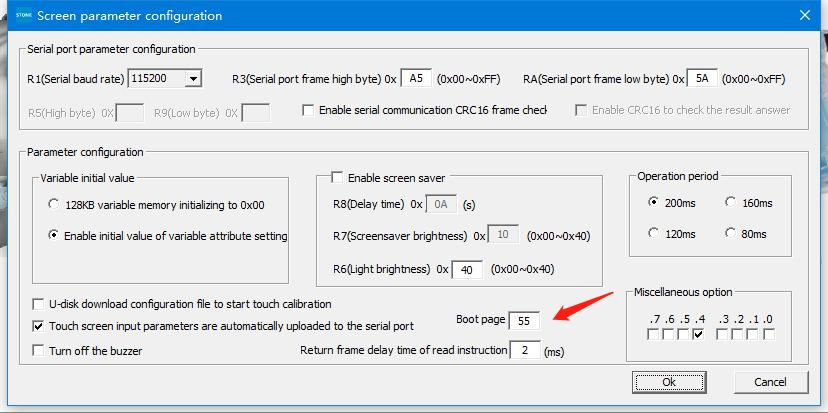
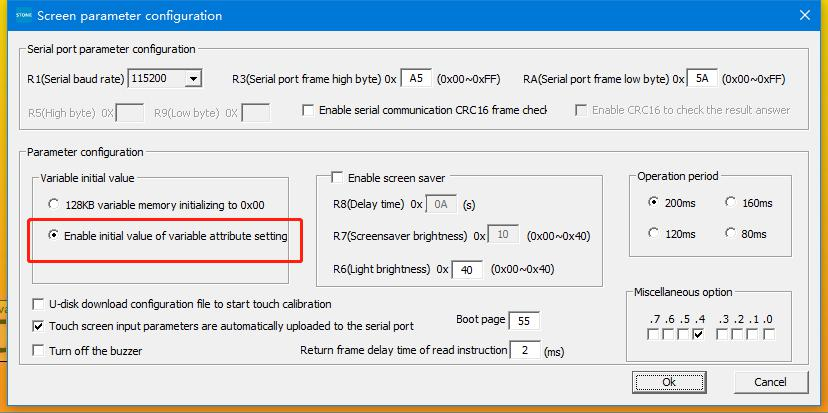
Firstly, set the boot image, tool — > screen configuration, as follows
首先,设置启动映像,工具->屏幕配置,如下所示
Then you need to add a video control to automatically jump after the power on page stops.
然后,您需要添加视频控件以在开机页面停止后自动跳转。
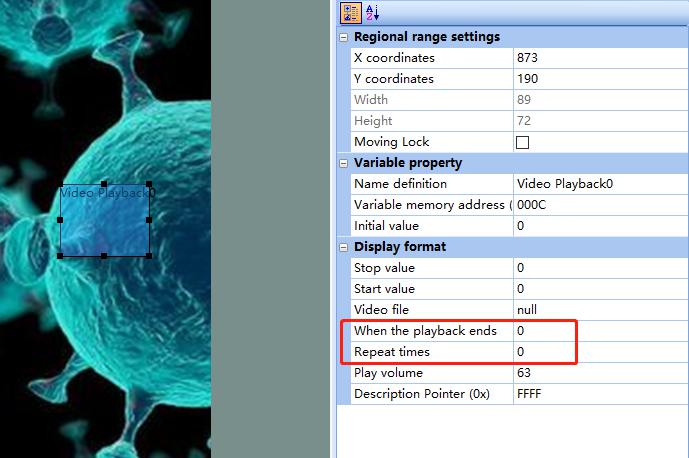
Here, it is set to jump to page 0 when the power on page stops, and the number of repetitions is 0, indicating no repetitions.
此处,设置为在上电页面停止时跳至第0页,并且重复次数为0,表示没有重复。
选择界面的设定 (Setting of selection interface)
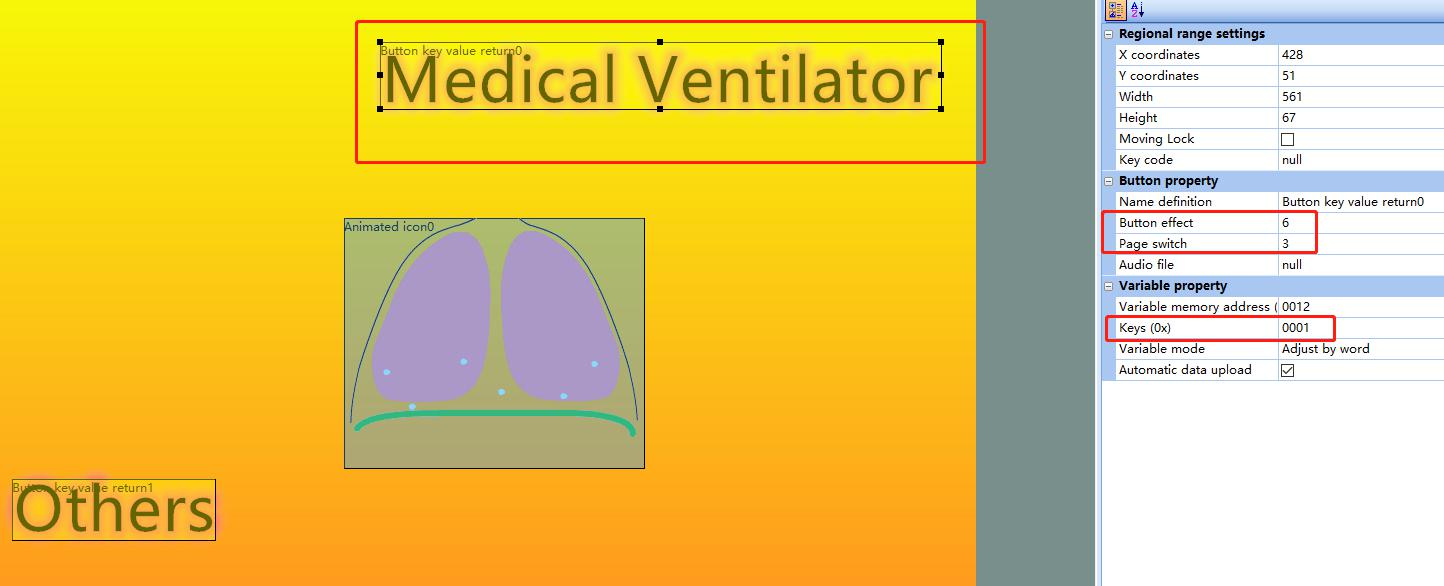
Here, the first button icon is set. The button effect adopts page 6, and switches to page 3. At the same time, 0x0001 value is sent to Arduino uno MCU to trigger data generation. The setting of the second key is similar, but the key value command is different.
此处,设置了第一个按钮图标。 按钮效果采用第6页,并切换到第3页。同时,将0x0001的值发送到Arduino uno MCU以触发数据生成。 第二个键的设置相似,但是键值命令不同。
动画效果设置 (Animation effect settings)
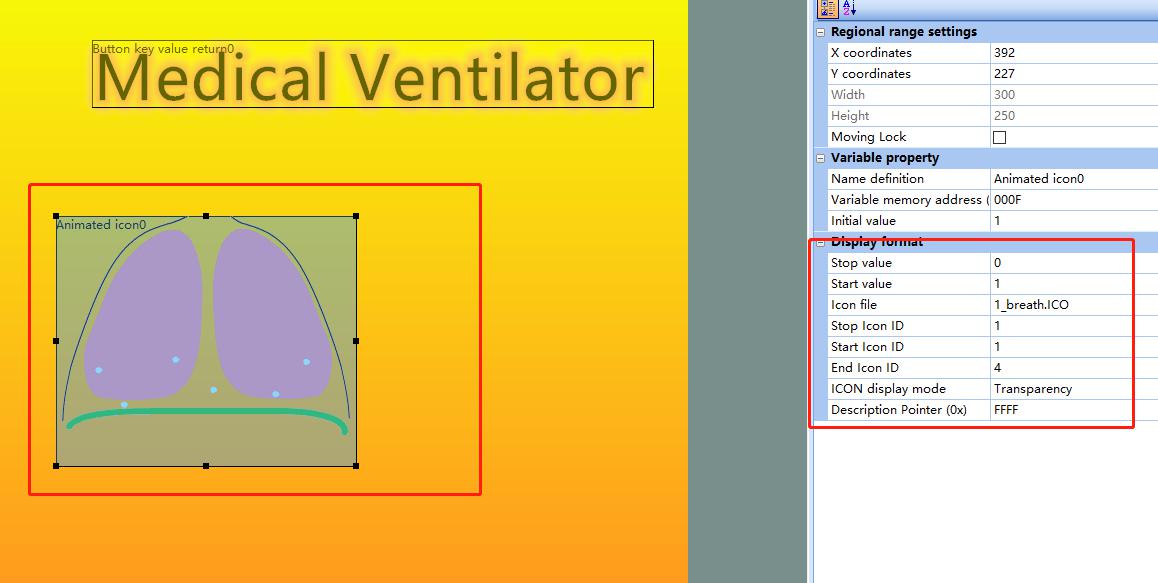
Here we add the 1_breath.ico icon made in advance, and set the animation stop value and start value, as well as the stop picture as 1 and the start picture as 4, and set it to not display the background. This is not enough. If you need the animation to move automatically, you need to make the following settings:
在这里,我们添加预先制作的1_breath.ico图标,并将动画停止值和起始值以及停止图片设置为1,将开始图片设置为4,并将其设置为不显示背景。 这还不够。 如果需要动画自动移动,则需要进行以下设置:
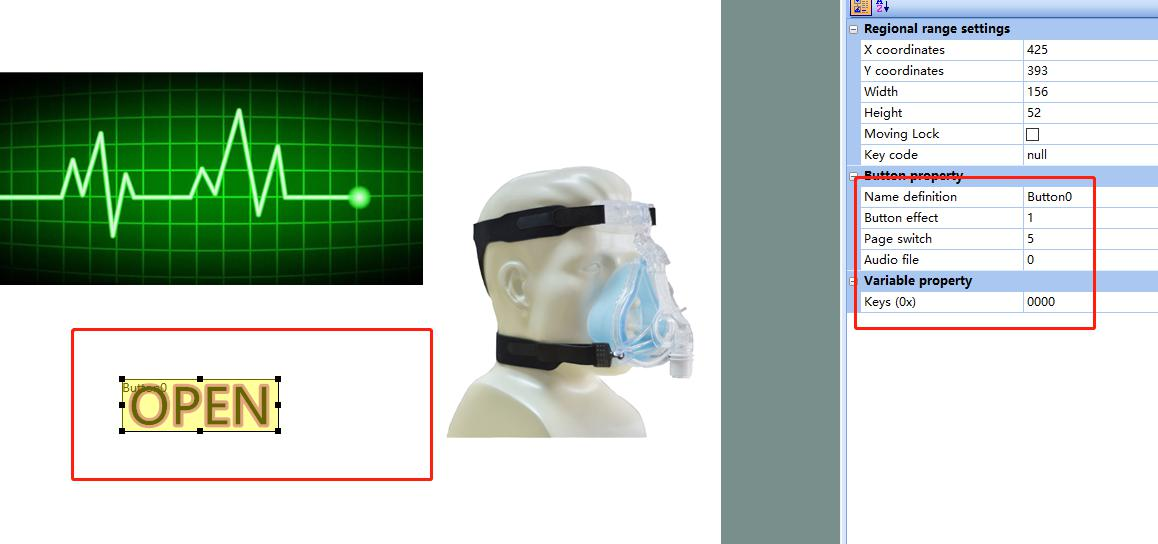
添加音频文件 (Add audio file)
After power on at the beginning, when click open. to realize the voice prompt function, you need to add audio file, where the audio file number is 0.
开始时打开电源后,单击打开。 要实现语音提示功能,需要添加音频文件,音频文件号为0。
实时曲线 (Real-time Curve)
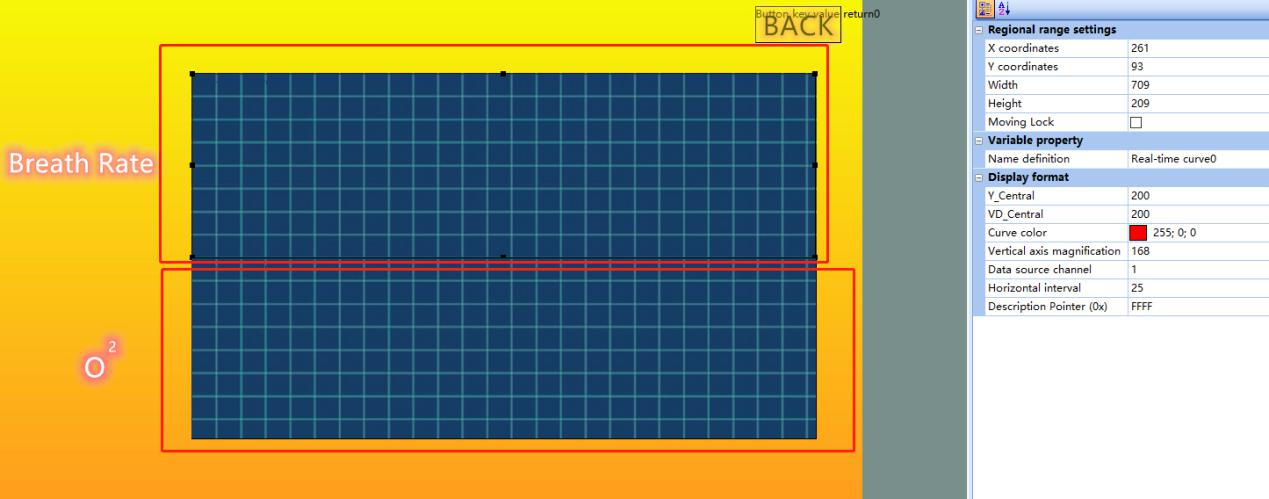
Here I have made two waveforms. In order to realize the separate control, I have adopted two data channels, namely channel 1 and channel 2. It is better to set the Y_Central and YD_Central values and colors. And the command is as follows:
在这里,我做了两个波形。 为了实现单独的控制,我采用了两个数据通道,即通道1和通道2。最好设置Y_Central和YD_Central的值和颜色。 命令如下:
uint8_t StartBreathWave[7] = {0xA5, 0x5A, 0x04, 0x84, 0x01, 0x01, 0xFF};
uint8_t StartBreathWave [7] = {0xA5、0x5A,0x04、0x84、0x01、0x01、0xFF};
uint8_t CleanBreathWave[6] = {0xA5, 0x5A, 0x03, 0x80, 0xEB, 0x56};
uint8_t CleanBreathWave [6] = {0xA5,0x5A,0x03,0x80,0xEB,0x56};
uint8_t StartHeartO2Wave[9] = {0xA5, 0x5A, 0x06, 0x84, 0x06, 0x00, 0xFF, 0x00, 0x22};
uint8_t StartHeartO2Wave [9] = {0xA5、0x5A,0x06、0x84、0x06、0x00、0xFF,0x00、0x22};
uint8_t CleanHeartO2Wave[6] = {0xA5, 0x5A, 0x03, 0x80, 0xEB, 0x55};
uint8_t CleanHeartO2Wave [6] = {0xA5,0x5A,0x03,0x80,0xEB,0x55};
This completes the setting, and then compiles, downloads, and upgrades to the U disk.
这样就完成了设置,然后编译,下载并升级到U盘。
连接 (Connection)
码 (Code)
/*
/ *
Serial
序列号
*/
//#include <HardwareSerial.h>
#include "stdlib.h"
int incomedate = 0;
//#define UBRR2H
//HardwareSerial Serial2(2);
uint8_t i = 0, count = 0;
uint8_t StartBreathWaveFlag = 0;
uint8_t StartHeartO2WaveFlag = 0;

uint8_t EnterBreathWave[9] =    {0xA5, 0x5A, 0x06, 0x83, 0x00, 0x12, 0x01, 0x00, 0x01};//
uint8_t BreathBackToBg[9] =     {0xA5, 0x5A, 0x06, 0x83, 0x00, 0x14, 0x01, 0x00, 0x02};//

uint8_t EnterHeartO2Wave[9] =   {0xA5, 0x5A, 0x06, 0x83, 0x00, 0x13, 0x01, 0x00, 0x03};//
uint8_t HeartO2BackToBg[9] =    {0xA5, 0x5A, 0x06, 0x83, 0x00, 0x15, 0x01, 0x00, 0x04};//

uint8_t RecievedTemp[9] = {0};

uint8_t StartBreathWave[7] = {0xA5, 0x5A, 0x04, 0x84, 0x01, 0x01, 0xFF};//
uint8_t CleanBreathWave[6] = {0xA5, 0x5A, 0x03, 0x80, 0xEB, 0x56};//

uint8_t StartHeartO2Wave[9] = {0xA5, 0x5A, 0x06, 0x84, 0x06, 0x00, 0xFF, 0x00, 0x22};//
uint8_t CleanHeartO2Wave[6] = {0xA5, 0x5A, 0x03, 0x80, 0xEB, 0x55};//

void setup() {

  Serial.begin(115200); //115200

}

void loop()
      if(RecievedTemp[8] == 0x01)
      {
          StartBreathWaveFlag = 1;
          StartHeartO2WaveFlag = 0;
          Serial.write(CleanBreathWave, 6);
          delay(1000);
      }
      else if(RecievedTemp[8] == 0x02)
      {
          StartBreathWaveFlag = 0;
          Serial.write(CleanBreathWave, 6);
      }
      else if(RecievedTemp[8] == 0x03)
      {
          StartHeartO2WaveFlag = 1;
          StartBreathWaveFlag = 0;
          Serial.write(CleanHeartO2Wave, 6);
          delay(1000);
      }
      else if(RecievedTemp[8] == 0x04)
      {
          StartHeartO2WaveFlag = 0;
          Serial.write(CleanHeartO2Wave, 6);
      }

  }

  if(StartBreathWaveFlag == 1)
  {
        delay(1);
        Serial.write(StartBreathWave, 7);

                i = rand();
            StartBreathWave[6] = i;
  }
  else if(StartHeartO2WaveFlag == 1)
  {
        delay(1);
        Serial.write(StartHeartO2Wave, 9);

                i = rand();
            StartHeartO2Wave[6] = i;
            i = rand();
            StartHeartO2Wave[8] = i;

  }
}
翻译自: https://habr.com/en/post/506330/
uno arduino